ESPeriments with Nginx (Part II)
Aaaaaaand we’re back!
Right, so we’ll kick off from the last post, where we’d gotten the basic stuff up and running. The next thing to do was to secure the server with SSL. This was necessary because it was necessary to bulletproof some parts of the system,specifically the API endpoint. A hypothetical attacker could seek to compromise the API-bound authentication process by performing a man-in-the-middle (MITM) attack where he’d/she’d have a machine pretend to be the auth server, and would configure the fake machine to respond favorably to any tag of their choice, and possibly even deny other tags. With SSL, the client would be able to verify the identity of the remote auth server, which would be a huge plus. Note that there are other ways of attacking such a system, but I will not enumerate them here.
This scenario naturally provided two salient points: one, the API endpoint absolutely needs SSL. It then stood to reason that (at least initially) the API endpoint would need to be configured to be accessible only via HTTPS connections, while the regular web application could continue using HTTP (at least for the meantime). So, the whole bulletproofing process is broken down into three major parts:
i) Generate/obtain SSL certificate
ii) Configure Nginx to use given SSL certificate to secure API route
iii) Configure hardware to verify SSL certificate
For educational purposes, we will generate a self-signed SSL certificate. SSL certificates are either self-signed or Certificate Authority (CA) issued. The latter type are issued by these “CAs”, which are well-known entities that can basically vouch for the authenticity of a given site. Browsers have a list of CAs, with the implicit understanding that a certificate from any CA means that the site in question is not malicious/authentic/verified to be safe based on the recognizance of the CA. On the other hand, self-signed certificates basically identify sites on their own recognizance. That is, a self-signed certificate essentially informs the client that: “I’m real/safe/authentic!”. Since anyone could generate a self-signed certificate, these types of certificates are not usually recognized as implying any real authenticity of the bearing site. Most (if not all) browsers, on encountering such a certificate, immediately display a warning page informing you that the certificate is self-signed and thus the site cannot be vouched for. You may still ignore the warning though. Most importantly, both CA-issued and self-signed certificates still provide end-to-end encryption of the link between the client and the server. CA-issued certificates cost money (although a CA called Let’s Encrypt issues free certificates) and are used when deploying a site on the internet or in production.
So, back to step one. Generating an SSL certificate and private key (the latter is also needed as SSL uses asymmetric encryption techniques) is outlined on this page. Once you’ve generated the certificate and key, we will now turn to the Nginx configuration. Don’t forget where you stored these files i.e the .crt and .key files that were generated as described on that page.
Nginx uses site-by-site configuration files, typically stored in the /etc/nginx/sites-available directory. To enable a given configuration, a symbolic link to a given configuration file (e.g abc.conf) is made in the /etc/nginx/sites-enabled directory. Thus, we will begin by creating a custom configuration file in the sites-available directory.
The structure of the configuration files is fairly straightforward. For more details, this page explains that structure in detail, and I strongly recommend going through it first. We’ll create two configuration blocks – one for the API route, and the other for all other routes i.e a catch-all block. We’ll also put the API route block first, so that it has a higher precedence than the catch-all block for the other routes. In my limited experience putting the API block after the catch-all block ensures that the API route-specific configuration does not have any meaningful effect.
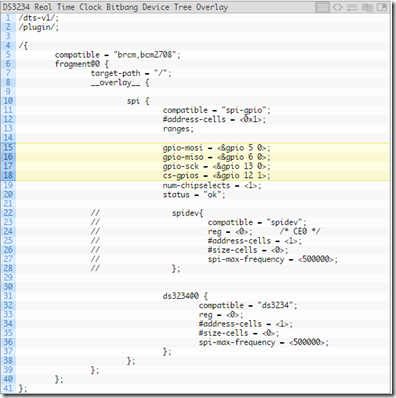
Here’s a snippet from my configuration file.

As can be seen from the snippet, the API route configuration block comes first. It specifies that SSL is to be used (via port 443) and specifies the paths to the certificate and key files. At this point, you should have specified the target directory for the .crt and .key files during the certificate generation process. I’m using /etc/nginx/ssl as described in that post. You should set the ssl_certificate and ssl_certificate_key directives (from the snippet above) to point the paths of your own .crt and .key files. The server_name directive should ideally specify the IP or DNS name of your server, but it doesn’t seem to make much of a difference in practice…
Looking at the overall block itself, its apparent that the “location” bit defines the location/path to which those options applies, which is /api/ in this case. Within the location block it can be seen that Nginx simply proxies the incoming connection to the self-hosted NancyFX app’s endpoint. The effect of this is that Nginx handles the SSL bits and lets the Nancy application focus on doing whatever it is supposed to do. If you still want to do SSL with the Nancy app itself, this link and this link explain how its done.
The second block is basically the same as the configuration described in the NancyFx documentation here, with the addition of the /api/ location again. The reason for this is simple: the Nancy app itself uses regular HTTP so it is still possible to access the API endpoint over regular HTTP. There’s probably no harm in that, but for purposes of form, we may want to allow only HTTPS access to the endpoint. Thus, the /api/ configuration block was added. It essentially returns a HTTP 405 status code (Method not allowed) when /api/ is accessed over HTTP. You could also have returned a 301 (permanent redirect) and redirected the request to the HTTPS endpoint, but I’m lazy so…
That brings us to the end of this post. In the next post, we’ll test our new SSL-secured API endpoint with some tools and learn a trick or two when sorting out SSL certificate issues.
See you soon!
Right, so we’ll kick off from the last post, where we’d gotten the basic stuff up and running. The next thing to do was to secure the server with SSL. This was necessary because it was necessary to bulletproof some parts of the system,specifically the API endpoint. A hypothetical attacker could seek to compromise the API-bound authentication process by performing a man-in-the-middle (MITM) attack where he’d/she’d have a machine pretend to be the auth server, and would configure the fake machine to respond favorably to any tag of their choice, and possibly even deny other tags. With SSL, the client would be able to verify the identity of the remote auth server, which would be a huge plus. Note that there are other ways of attacking such a system, but I will not enumerate them here.
This scenario naturally provided two salient points: one, the API endpoint absolutely needs SSL. It then stood to reason that (at least initially) the API endpoint would need to be configured to be accessible only via HTTPS connections, while the regular web application could continue using HTTP (at least for the meantime). So, the whole bulletproofing process is broken down into three major parts:
i) Generate/obtain SSL certificate
ii) Configure Nginx to use given SSL certificate to secure API route
iii) Configure hardware to verify SSL certificate
For educational purposes, we will generate a self-signed SSL certificate. SSL certificates are either self-signed or Certificate Authority (CA) issued. The latter type are issued by these “CAs”, which are well-known entities that can basically vouch for the authenticity of a given site. Browsers have a list of CAs, with the implicit understanding that a certificate from any CA means that the site in question is not malicious/authentic/verified to be safe based on the recognizance of the CA. On the other hand, self-signed certificates basically identify sites on their own recognizance. That is, a self-signed certificate essentially informs the client that: “I’m real/safe/authentic!”. Since anyone could generate a self-signed certificate, these types of certificates are not usually recognized as implying any real authenticity of the bearing site. Most (if not all) browsers, on encountering such a certificate, immediately display a warning page informing you that the certificate is self-signed and thus the site cannot be vouched for. You may still ignore the warning though. Most importantly, both CA-issued and self-signed certificates still provide end-to-end encryption of the link between the client and the server. CA-issued certificates cost money (although a CA called Let’s Encrypt issues free certificates) and are used when deploying a site on the internet or in production.
So, back to step one. Generating an SSL certificate and private key (the latter is also needed as SSL uses asymmetric encryption techniques) is outlined on this page. Once you’ve generated the certificate and key, we will now turn to the Nginx configuration. Don’t forget where you stored these files i.e the .crt and .key files that were generated as described on that page.
Nginx uses site-by-site configuration files, typically stored in the /etc/nginx/sites-available directory. To enable a given configuration, a symbolic link to a given configuration file (e.g abc.conf) is made in the /etc/nginx/sites-enabled directory. Thus, we will begin by creating a custom configuration file in the sites-available directory.
The structure of the configuration files is fairly straightforward. For more details, this page explains that structure in detail, and I strongly recommend going through it first. We’ll create two configuration blocks – one for the API route, and the other for all other routes i.e a catch-all block. We’ll also put the API route block first, so that it has a higher precedence than the catch-all block for the other routes. In my limited experience putting the API block after the catch-all block ensures that the API route-specific configuration does not have any meaningful effect.
Here’s a snippet from my configuration file.

As can be seen from the snippet, the API route configuration block comes first. It specifies that SSL is to be used (via port 443) and specifies the paths to the certificate and key files. At this point, you should have specified the target directory for the .crt and .key files during the certificate generation process. I’m using /etc/nginx/ssl as described in that post. You should set the ssl_certificate and ssl_certificate_key directives (from the snippet above) to point the paths of your own .crt and .key files. The server_name directive should ideally specify the IP or DNS name of your server, but it doesn’t seem to make much of a difference in practice…
Looking at the overall block itself, its apparent that the “location” bit defines the location/path to which those options applies, which is /api/ in this case. Within the location block it can be seen that Nginx simply proxies the incoming connection to the self-hosted NancyFX app’s endpoint. The effect of this is that Nginx handles the SSL bits and lets the Nancy application focus on doing whatever it is supposed to do. If you still want to do SSL with the Nancy app itself, this link and this link explain how its done.
The second block is basically the same as the configuration described in the NancyFx documentation here, with the addition of the /api/ location again. The reason for this is simple: the Nancy app itself uses regular HTTP so it is still possible to access the API endpoint over regular HTTP. There’s probably no harm in that, but for purposes of form, we may want to allow only HTTPS access to the endpoint. Thus, the /api/ configuration block was added. It essentially returns a HTTP 405 status code (Method not allowed) when /api/ is accessed over HTTP. You could also have returned a 301 (permanent redirect) and redirected the request to the HTTPS endpoint, but I’m lazy so…
That brings us to the end of this post. In the next post, we’ll test our new SSL-secured API endpoint with some tools and learn a trick or two when sorting out SSL certificate issues.
See you soon!

For those who prefer clean dashboards and no fluff 👉👉👉 Crypto Market Monitor is worth checking out.
ReplyDelete