Posts

Nancy

Image
Hello all, I’m hoping everyone has had a good week. Tis Thursday folks, the weekend’s a’comin’! I also realized that I barely blog about anything C#, which is a shame since the blog’s tagline implies I should, so this week I’m going to talk about Nancy. I’ll take a rain check on the Alchemy thing though… NancyFx or Nancy for short is a lightweight, server-side web framework for the .NET framework. Basically, it comes into play when you’re trying to build a web-application with server-side smarts, such as a data-bound application (where data is stored, queried and retrieved), building web APIs (web apps returning XML or JSON data in response to requests) and things like that. Granted, there are tons of neat frameworks to do this for every language – there’s Django for Python, there’s ASP.NET and ASP.NET MVC for the dotNet framework itself, etc. However, ASP.NET and ASP.NET MVC are rather heavy and (for me) rather difficult and clunky to deploy on non-Windows hosts. If you’re going t...
Getting Started with Logic Analyzers and Pulseview

Image
Hey all, Been a while. Hope you’ve been up to no good, hm? A couple of days ago, I had to do some low-level I2C work on a bare-metal ATMega328P. Digging out the datasheet, I cobbled a simple I2C driver together, the purpose of which was to permit me write a driver for the particular peripheral which would call the lower-level functions the driver provided (i.e things like i2c_start(), i2c_stop(), i2c_address(), etc etc). When I finished the I2C driver, I tested it out with an MMA8452Q I had lying about and it seemed to work just fine. Believing everything to be dandy, I went ahead and wrote the peripheral driver for the component I was working with. And that was when the funny stuff started. To cut that long story short, it wouldn’t work right when deployed to the hardware. At all. I was in a bit of a bind – the code looked great, no errors no nothing, so it was time to look at the hardware/wire-level end of things. Logic analyzers (in my limited understanding) are tools/instrume...

ButtonGizmo

Hey all, As promised, here’s the second update. I would’ve posted this back then, but I needed to sort through some issues beforehand. So without further ado… A couple of weeks ago, I posted about designing a USB-based input device, which would have four buttons, and whenever any of those buttons were pressed, would emit a USB report to the host (PC) specifying which of the buttons was pressed. That was followed up with another post detailing how to configure a V-USB device as a HID. Well, I sorta mashed everything together into a single project I call…*drum rolls* …ButtonGizmo. Let it be known that I’m not known for my astounding naming abilities. Essentially, ButtonGizmo is a HID with eight buttons, which operates as described earlier. While it doesn’t exactly solve a groundbreaking problem, its designed to be a simple starting point with V-USB and HID devices using the same. To this end, I’ve decided to put the hardware design (which is just a schematic – I built it on a stripbo...

Enabling SPI1 on the Raspberry Pi B+/Zero/2/3

Image
Me hearties, Let us plunder and pil.. Sorry, wrong blog. Ahem. Hey all, Its been a while. Been busy at work as usual, and haven’t really had much time to write much. As penance, I will post not one but two updates! This particular post is in relation to Raspberry Pi users specifically. I had earlier talked about the vagaries involved in emulating SPI over GPIO in order to get an additional SPI peripheral. It was a moderately involved process, but the rewards were great With the most recent release of the Raspbian Jessie distribution (2016-05-10), a number of improvements have been made to both the desktop parts and the “under-the-hood” parts, perhaps most significantly the kernel. This new release uses Kernel version 4.4, which now adds the ability to use the second hardware SPI peripheral, SPI1, on the Raspberry Pi. This is only available to devices with the 40-pin header (as seen from the title of this post) so users of the original model A and B will probably need to turn to...

V-USB: The HIDden parts…

Image
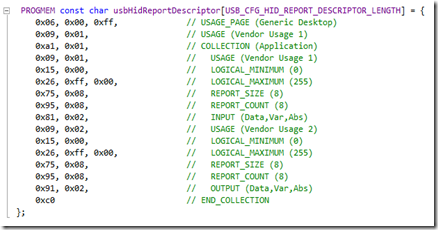
Hello again, Its been a while. Been a bit busy with work and life generally, but I’m sure you know the feeling. Recently, I talked about getting started with V-USB and Atmel Studio 7 . In that post, I highlighted a strange occurrence I’d observed and a suitable workaround. That said, that was just me testing the waters with V-USB. I hadn’t really worked with it much after that, until earlier on today. I wanted to build a simple HID device which could be used as a custom input gizmo i.e it has four buttons, and every time I pressed a button, it would emit a report specifying which button was pressed. On the host side, an application would constantly poll the device and react as needed. Not exactly rocket science I admit, but still somewhat complex since I’d never done it before. This post tries to explain why. First off, I had to specify (in code) that the device was a HID device. This is typically done by creating/modifying the device descriptor appropriately. Luckily, V-USB has an...

MRAA and Python on Ubilinux

Yo. I was recently talking to a colleague who was doing some Python work, and wasn’t entirely sure how to go about controlling a Galileo’s GPIO from a Python script. I knew that MRAA actually had Python bindings, but I’d never really been interested in them. Hence, I decided to dig a little deeper to see if I couldn’t get it to work. Turns out its a pretty straightforward process. Basically, you’ll need to have something called SWIG installed. Sadly, I’m not sure which particular version of SWIG it is I have, but I think its regular old Swig 2.0 (which is installed with ‘apt-get install swig’). You’ll also need Python 2.7.x and the Python development libraries, which is installed with ‘apt-get install python python-dev’. Once that’s done, the process is mostly as described in previous posts, with the cardinal difference that the cmake invocation is now as follows: cmake –DCMAKE_C_COMPILER=clang –DCMAKE_CXX_COMPILER=clang++ –DCMAKE_C_FLAGS=-march=i586 –mno-sse –mno-mmx –DCMAKE_CXX_FL...

Getting Started with V-USB and Atmel Studio 7

Hello again, As the title of this post says, I’m going to talk about messing about with VUSB and Atmel Studio 7. With regards to the former, I was looking for a cheap/easy way to build USB devices. Having used the excellent Teensy 2.0 from PJRC and the equally as excellent LUFA stack by Dean Camera, I have to say it was a really smooth experience, especially as LUFA got adopted by Atmel and is now a downloadable extension for their Atmel Studio IDEs. However, building more permanent stuff with surface-mount chips while being the way of the future, is relatively difficult for me. Simply put, I have trouble soldering such fine-pitched devices so its really a personal thing. Besides, USB-capable AVRs are fairly more expensive than their DIP counterparts and we all know what that means.. In any case, V-USB is a software-based stack for building Low-speed USB devices with AVR chips. Rather than using the…regular…means (1 or more interrupt/bulk/isochronous Endpoints) data is mostly transfe...